LPCOpen FreeRTOS TCP Echo Example
This page demonstrates LPCOpen's FreeRTOS TCP echo example, which uses the
open source lwIP TCP/IP stack. Following pages demonstrate how to incorporate
the previously demonstrated virtual COM
functionality into this example, and how to use FreeRTOS to make both the
TCP and USB functionality event driven to massively improve their run time
efficiency.
It is assumed that all preceding steps
have already been completed, so the
necessary tools have already been installed,
and the chip support and board support library projects have already been imported.
Workflow steps:
-
Open the LPCOpen zip file in the LPCXpresso Eclipse
import window once again, and this time select and import the
freertos_tcpecho project.

Importing the FreeRTOS TCP echo project
-
The workspace should now include four projects. Right click
on the freertos_tcpecho project, then select 'Build Project'
from the pop up menu. The LPC1800 chip and board support packages
are dependencies of the freertos_tcpecho project, so all three
projects will get built (if the workflow pages are being
followed in order then the chip and board support projects will
already be up to date).

Building the freertos_tcpecho project
-
For simplicity of instruction the TCP stack will be configured to
use a fixed IP address, rather than a DHCP server.
Locate the LWIP_DHCP setting in the lwipopts.h header file, and
set it to zero.

Locating the lwipopts.h header file in the project,
and the LWIP_DHCP setting within the header file
-
As DHCP is not being used it is important to ensure the fixed
IP address setting is compatible with your network. This can normally
be ensured by setting the first three octets of the target's IP address
to be the same as the first three octets of the IP address of
your host computer - and the last octet of the target's IP address
to a value that is not already used on the network. For example,
if the IP address of your host is 192.168.0.10, then a compatible
address to which the target's IP address can be set is 192.168.0.100
- provided that address is not already in use on the network.
Locate the comment "Static IP assignment" within the
freertos_tcpecho.c source file, then set the static IP address
to an appropriate value. The default address used in the image
below was 10.1.10.234, and in this example I changed it to
10.134.134.200 (as can be seen in the last image on the page).

Locating the freertos_tcpecho.c source file and
setting the fixed IP address.
-
It is assumed that the target Xplorer board is already connected
to your host computer through a suitable debug adaptor and is
powered up. This time it is also necessary to connect the Xplorer
board to the network. If you are connecting the Xplorer board
directly to your host computer then a point to point (cross over)
network cable is required. If you are connecting the Xplorer board
to a network hub or switch then a standard network cable can
be used.
-
Ensure that freertos_tcpecho is highlighted in the
Eclipse project explorer window, then click the 'Debug freertos_tcpecho'
button visible in the 'Start Here' window (see the image below).
The microcontroller's flash memory will be programmed and the
debugger will break at the start of the main() function.

The 'Debug freertos_tcpecho' button in the Start Here window
-
Select 'Resume' from LPCXpresso's 'Run' menu to run the
application. Check the echo server is working by opening a
Windows command prompt, then type "ping" followed
by the IP address assigned to the target.
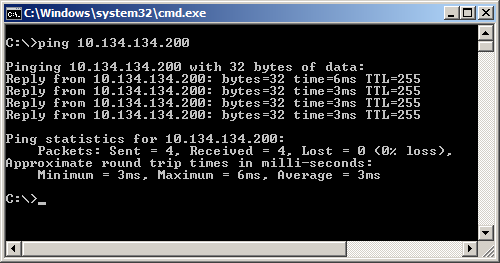
Receiving ping replies from the LPC1830 target
Next:
Adding the USB functionality into the FreeRTOS TCP echo example
Copyright (C) Amazon Web Services, Inc. or its affiliates. All rights reserved.